Tuesday, January 3, 2012

Ham and Swiss Sliders


I made these great little sliders for New Years Eve.. I got the idea off of Pinterest.com. Freaking LOVE that site. I tried the recipe the way I found it.. but I really didn't care for their version of the onion mixture.. which cooked the onions with mustard, from raw.. instead of caramelizing them first. It made them very bitter and spicy in my opinion. So I dumped them out and started over, doing my own thing. The sliders were such a big hit.. The husband asked me to make them again tonight. So that's what I did.. and this time I took pictures *and* made a kid friendly, no onion, version! :) Didn't get pics of the kid friendly, except for the final product, but it was really quite simple and not worth the photo.

Here's what you're gonna need:
1 small onion, minced
1 stick of softened butter, divided
heavy pinch of salt
1/2 tsp mustard powder
1 tsp garlic powder
1/2 tsp pepper
2 tsp Dijonnaise
1-2 tablespoons worcestershire sauce
1 package Hawaiian sweet rolls(12 rolls)
8 slices of thin sliced ham, I like Virginia baked ham
4 slices swiss cheese (I use Kraft "big" slices.. it may take more of the smaller slices to completely cover the rolls and ham)

I started with some onion. Pretty much how all my good ideas start out.. slow cooking onion in butter. For this recipe I minced up a smallish one and cooked it over med-low heat in half a stick of butter with a heavy pinch of salt for about 10 minutes until it was nice and sweet.

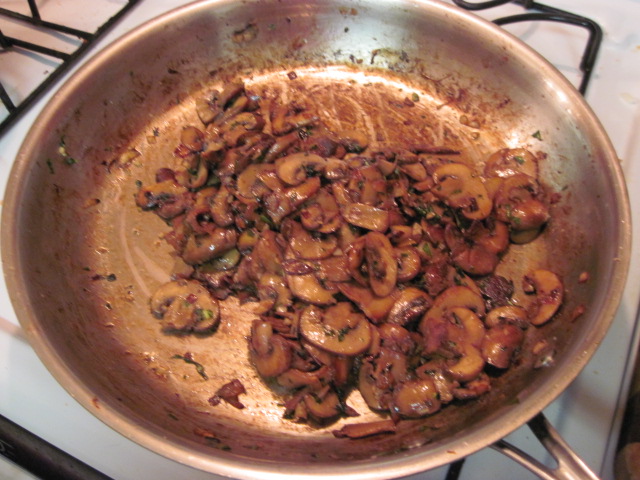
Next you're gonna need these things: some ground mustard, garlic powder, worcestershire sauce, and some of this hellmans dijonnaise along with 2 tablespoons of that butter you see there in the back.. Now if you don't have the dijonnaise and you don't feel like buying it.. you could just use dijon mustard. Or regular mustard. You could even be crazy and put honey mustard in it. Or you could do no mustard if mustard isn't your thing.. but I don't recommend that. Because mustard IS my thing. Anywhoo.. once your onions are nice and caramelized, your gonna add in these ingredients, and give it a good stir and let it cook for just a minute then take it off the heat.

Next you're gonna take your rolls and slice them in half horizontally, leaving them intact with one another. Like this.. so you have a top and bottom bun.
And then you're gonna put the bottom half of your rolls into a foil lined baking dish and spread about 3/4's of the onion mixture onto it..
Then you're gonna take the remaining two tablespoons of softened butter and spread it on top of the onions.

Now just layer the ham on like this

Top it with the cheese

Then top it with the tops of the buns. Now just spread the remaining 1/4th of the onion mixture and whatever melted butter is left in the pan all over the tops of the buns. You're making homemade onion buns!! I love onion buns, so this just tickles my fancy to no end.
Now just cover it with some foil and stick it in the oven at 325 for about 15-20 minutes, until the cheese startes getting melty.. then pull the foil off the top and let them brown for an additional 3-5 minutes. Once they are done, just use a sharp knife to cut the sliders apart along the lines of the buns.


I didn't even serve them on a tray.. I just popped the baking pans on the table and let everyone go for it. LOL

As for the kid friendly version. I just omitted the onion mixture completely.. I took a stick of softened butter and mixed in a tablespoon or two of the dijonnaise stuff. and spread that on the bottoms of the buns, then melted what was left to brush across the tops. Worked great and the kids all loved it! Oh I should mention, I cook for a brood.. so that whole stick of butter was spread between two packs of rolls. One was the hawaiian bread and the other was a regular white dinner roll, for the pickiest eater in all the land.. who doesn't like hawaiian rolls. Turned out good. Because this time I had to get the "honey wheat" version of the hawaiian rolls instead of the regular hawaiian sweet bread.. And they got too dark on the bottoms. Didn't have that problem on New Years Even, or with the regular white dinner rolls I made tonight.. Just the honey wheat version.. even cooked a batch of each kind of bread in the same pan, so I know it wasn't the pan or the oven.. it was the wheat bread. So I honestly don't recommend it, even though it's healthier, unless you REALLY watch it or turn the oven down.

I confess this picture is of the ones from New Years Eve.. they were prettier. haha

Enjoy!

Monday, January 2, 2012

Happy New Year Ravioli!


So the husband finally got me a pasta maker for Christmas this year. I'm *beyond* myself with excitement. We finally broke it in for some New Years Day Ravioli.. We've decided it's to be our new tradition. :)

I'm sorry I have no photos of when I was mixing the dough together or kneading it in the KitchenAid with the dough hook. I didn't think to get the camera out until I was sauteing onions for the sauce. Whoops. I usually only do one photo of the finished product of a recipe, but this time I wanted to do it a little more like most of the food bloggers and get some photos of various steps.. I'm new at that, so I didn't get everything, but I got most of the steps. I hope whoever stumbles upon this enjoys. :)

Here's what you need for the pasta dough:
2 cups all purpose flour
Pinch of salt
2 eggs
2 tsp olive oil
2-3 Tablespoons water

Plus an egg wash when filling and sealing the raviolis:
1 egg, lightly beaten
1tsp water

To start making the pasta, I measured out 2 cups of AP flour and the salt into a large mixing bowl and created a large well in the center of the flour. I cracked two eggs into a small bowl and poured a couple teaspoons of olive oil into them, and gave them a whisk with a fork and the poured them into the well. (Gosh I wish I had photos of this part.. Next time, I promise!! I am planning to do some fettucini or linguini this week because I want to try out the cutters) Anywhooo.. Once I poured the eggs into the well, I whisked them in a circular motion, just barely bringing some of the flour into the eggs each time I stirred around the bowl with the fork. Once the mixture started coming together, I added a couple tablespoons of water and worked the dough into a ball. I kneaded it by hand a few times to make sure it was all together nicely.. then I tossed it into my KitchenAid with the dough hook and turned it onto 2 for about 5 minutes. After doing that I had a nice smooth pliable dough. I wrapped it in plastic wrap and set it in the fridge while I set about making the sauce and the filling.. that's where I remember the camera and started taking pictures.

For the Sauce you need:
1/2 small onion, minced
1 Tbs olive oil
3 cloves garlic, minced
1 Tbs Tomato Paste
1 large can crushed tomatoes
1 large can tomato puree
large stem of basil leaves, intact
pinch of sugar
salt and pepper to taste
handfull of chopped fresh basil


For the sauce I minced up half a smallish onion and sauteed it in a tablespoon or so of olive oil with a pinch of salt.

Once the onions became translucent I added in the minced garlic and the tomato paste and gave it a stir.


Then I poured in a can of crushed tomatoes.. apparently I bought the Italian herbs kind, I didn't realize I had done that. LOL


And then a can of tomato puree.. I like this SO much better than tomato sauce.

Then I add in a big stem full of basil. I like to keep it whole and let it simmer with the sauce, then fish it out after the sauce is done.. and stir in some fresh basil. I think it gives the sauce a nice cooked in basil flavor as well as the brightness of the fresh chopped kind at the end.

Then I clap a lid on it and set the burned to the lowest heat and it's pretty much ready to go, aside from a pinch of sugar and some salt and pepper adjustments at the end, as well as the handful of fresh chopped basil. (which I don't think I got a pic of, sorry LOL)


And so while that simmered on the back of the stove, I got started on the mushroom filling.

Here's what you need for the mushroom filling:
1lb cremini mushrooms, sliced
the other half of the small onion, minced
1 stick of butter
3 cloves of garlic, minced
small handfull of basil leaves, minced
1 Tbs half and half
1-2 cups shredded Asagio cheese
salt and pepper to taste

I started by slicing up a pound of cremini mushrooms. My absolute favorite mushroom int he whole universe. Love em.
And I sauteed them in a whole stick of butter and the other half of my onion, minced up.. but with no salt yet.


While those cooked (which took about 8 to 10 minutes on super high heat), I minced up some garlic and basil. Which I added in once the mushrooms were nice and brown.
Then I deglazed the pan with a splash of half and half and it looked like this.. mmmmmm yummy

I forgot to take pics of what I did next.. But I poured the mushrooms into the food processor and pulsed it 5 or 6 times until I had a nice mince on the mushrooms, but not total mush. I poured them into a bowl and let them cool down while The Husband and I rolled out the dough with my new pasta roller. Once the we were ready to start filling, I mixed the minced mushroom and onion mixture with the shredded asagio cheese and adjusted the seasonings.

So.. As for rolling the dough. We had such a good time doing this. I REALLY love my new present. It's so freakin awesome.

So we start by cutting off about 1/4th of the dough and passing it through the machine on the largest setting a couple times.. folding it in half and repeating on the largest setting two or three times.

Until it starts streching out and getting longer.. then start closing the rollers up, one setting at a time.. and passing the dough through once or twice on each setting.

Keep on going till it gets nice and long and thin enough to read the paper through it (heard that on tv yesterday so decided that's what I needed LOL)

This is definitely a two person job. The husband turned the hand crank and held the machine steady on the table while I fed the dough in and out of the machine. We made a good team :)

Then I started filling each sheet, with a tablespoon of the mushroom mixture every few inches. Then brushed all around each little mound with egg wash (just 1 egg beaten lightly with a teaspoon of water)
Then I folded the dough over in half on itself and pressed very closely to each little mound of mushrooms, making sure to squeeze out all of the air and sealing the pasta together around the filling

Then I used the fluted side of my smallest biscuit cutter to cut each ravioli out
and tossed them on a baking sheet that had been dusted with flour
I popped them into the freezer for 10 or 15 minutes while I got some salted water boiling and finished off my sauce by fishing out the stem of basil and adding the handful of chopped basil and some salt and pepper.. then I tossed the raviolis into the water and boiled them for about 4 or 5 minutes, until the pasta was al dente

I fished them out with my big spider thing and put them in my pasta bowl.. which happens to be decorated with raviolis. :)

Then I served it up in some matching bowls with my yummy sauce and a slice of buttered french bread..

And my second baby smiled at me like this when he finished his bowl
He happens to be a connoisseur of tomato sauce. And this is the smile he gets when I do NOT open a jar of Prego, and when I make it all from scratch for him, with fresh basil. I think he approved tonight. Even if he wouldn't try the mushroom ravioli and opted for the storebought cheese ones we got because we knew we had picky kids that wouldn't touch a mushroom to save their life. haha Oh well, more for me and dad. :)

Hope you guys enjoyed my photos.. big thanks to my son Andy, and The Husband for taking most of them.